Wine Cork Christmas Wreath Craft
This post may contain affiliate links. Please read our Disclosure Policy.
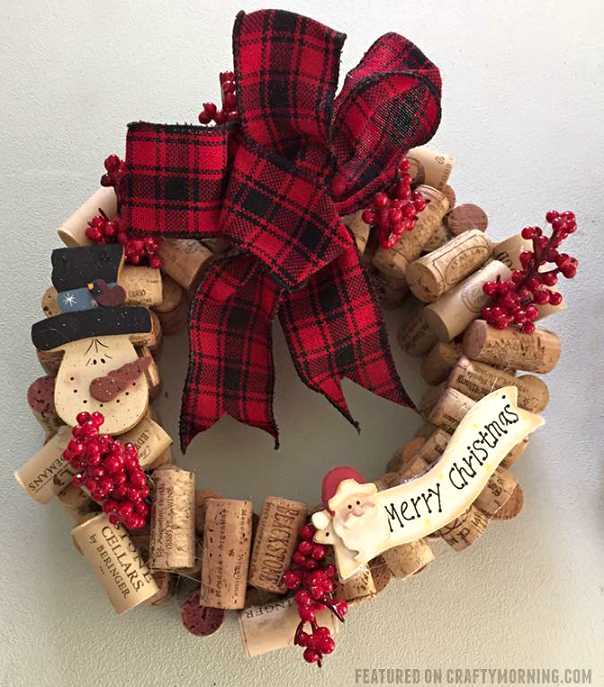
Today I am featuring Wendy Kayl’s beautiful wine cork Christmas wreath she made! She was so kind to share her tutorial with us too! You can find her on Facebook at A Door-able Crafts by Wendy.
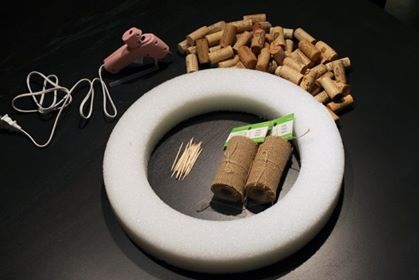
Materials:
- Foam wreath
- Corks – I used about 60-80 (You can find bulk wine corks)
- Toothpicks – you need the same amount of toothpicks as corks
- Burlap, at least 5 feet (another 5 feet if you want to do a bow)
- Hot glue gun
- Glue sticks – I used about a dozen
Directions:
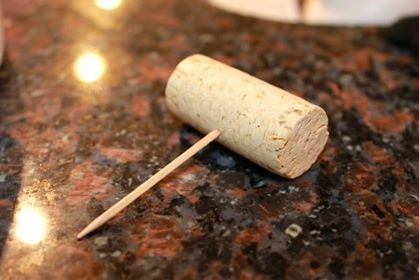
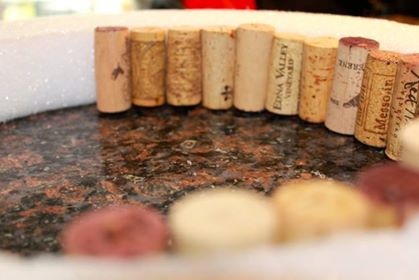
- Poke a toothpick through the long side of a cork. Add a little hot glue around the toothpick and along the toothpick side of the cork and glue/poke it along the perimeter of the wreath’s hole. Continue until you have glued/poked the cork all the way around the inner circle/inner part of the wreath.
- Next, hot glue the burlap to the outer perimeter of the wreath (you may have to cut your burlap to proper size).
- Cut more strips of burlap and glue them to the face of the wreath. You don’t need this part to be perfect—just enough coverage that you can easily hide the white foam with the corks. I lined the wreath with burlap because it eliminates the bits of stark white foam that the corks didn’t cover. You don’t need to do the last step on the backside of the wreath unless you want to. I didn’t because the backside isn’t visible to the naked eye, but it’s your choice (I didn’t even add corks to the back because you can’t tell by the way my wreath hangs on the door).
- And now go to town on gluing/poking the corks into the foam. Make sure to insert the toothpick into the long side of the cork (for a majority of them) and don’t forget the glue. I started on one side gluing/poking a few corks at a time, then I would alternate decorating the different sides, always a few corks at a time. -I didn’t have any pattern accept to follow some type of ordered chaos. You will need to do about two layers of the randomly placed corks. You really can’t mess this up unless you leave too many spaces in between the wine corks. Also, don’t be scared to cut some of the cork into smaller pieces because they can easily fit in some of the snug areas. Cutting cork is very easy with a regular chef’s knife.
- Once you have created the two layers on the face of the wreath, it’s time to apply the uniform cork alignment to the outer perimeter of the wreath. It’s very similar to how you glued/poked the corks into the inner part of the wreath. Again, I didn’t add corks to the backside of the wreath because you can’t tell by the way I hang it on my door. Feel free to decorate the back if you want it covered in corks (I saw it as saving a few bucks since I didn’t have to buy extra corks).
-I had a few gaps, so I proceeded to randomly add more corks on the wreath where I saw fit. Again, there really is no wrong way to create this type of look—just make sure you mix up the placement of the corks and don’t leave awkwardly shaped gaps that are difficult to fill or cover.
-If desired, add a burlap accessory/ribbon or other embellishments as you see fit
The entire project took me about three hours. It creates a bit of a mess and your fingers may be sore, however, the finished product is well worth it. Plus, nothing says ‘mature adult who likes to party’ like a wine cork wreath. I also found if you boil the corks before using them it’s easier to use and doesn’t have the wine smell..just make sure to allow them to dry and cool.