Paintbrush Santa Claus Ornaments
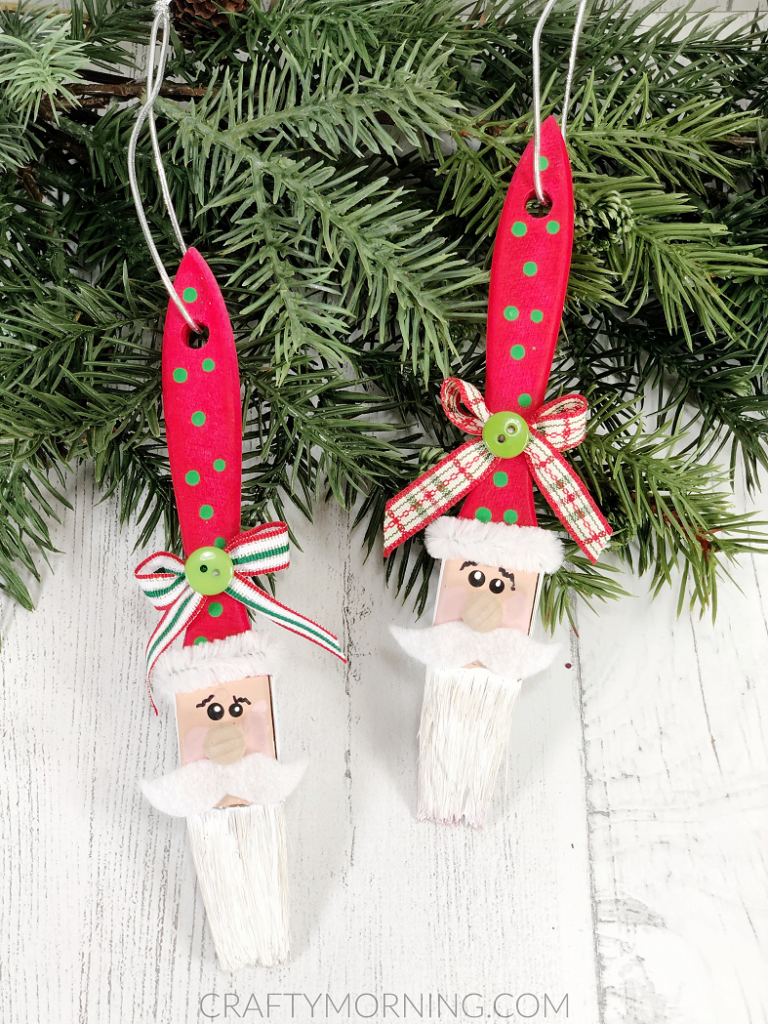
We love making Dollar Tree crafts! Did you know they sell paintbrushes? You can make so many cute ideas like these Santa Claus ornaments! You could also make elves, snowmen, you name it!
This post may contain affiliate links. Please read our Disclosure Policy.

Just paint the handles red for Santa’s hat and the metal part skin color for the face.

Then dip the bristles of the brushes into white paint for the beard!

Decorate with the rest with your imagination! We just love the little wooden ball noses! I need to make some paintbrush gnomes now!

Paintbrush Santa Ornaments
Ingredients
- Paintbrush One-Inch Wide – four in a package at the Dollar Store
- Chenille Stems White – Dollar Store
- Wooden Ball Small
- Felt Craft Sheet White
- Ribbon – Dollar Store
- Button – Dollar Store
- Silver Cord – Dollar Store
- Acrylic Craft Paint – Red Green, Light Peach, White, Black
- Paintbrush
- Glue Gun and Glue Sticks
- Repositionable Adhesive Runner
- Scissors
- Ruler
- Pencil
- Plain Paper
Instructions
- Gather all supplies. Paint the paintbrush handle with red acrylic craft paint which will be Santa’s hat. Apply a second coat, if necessary and then set aside to dry.
- Basecoat the metal section of the paintbrush with white acrylic craft paint which will be Santa’s hair. Apply a second coat, if necessary and then set aside to dry.
- Topcoat the front section of the paintbrush with a light peach or flesh tone color of your choice, which will be Santa’s face. Apply a second coat, if necessary and set aside to dry.
- Dip the bristles of the paintbrush into white acrylic craft paint, wipe off excess and then set aside to dry overnight. This will be Santa’s beard.
- Using pink, black and white acrylic craft paint, add rosy cheeks, eyes and eyebrows to Santa’s face. Glue unfinished wooden plug as Santa’s nose. The wooden plug can be left unfinished or painted to match Santa’s face.
- Dip the end of a working paintbrush handle into green acrylic craft paint and create a polka dot pattern on Santa’s hat.
- Draw a mustache on plain paper and cut out with scissors. Apply removeable adhesive to the mustache pattern, apply to white craft felt and cut out with scissors. Attach mustache to Santa’s face under his nose with a glue gun and glue sticks. You could also use craft foam or white fabric if you don’t have felt.
- Wrap white chenille stem around paintbrush to be the fur trim on Santa’s hat. Trim chenille stem with scissors and glue in place.
- Tie a bow from plaid ribbon and attach to Santa’s hat with a glue gun and glue sticks.
- Accent the ribbon bow with a colorful button, glued to the center.
- Measure and cut an eight-inch length of silver cord, thread through the hole at the top of the paintbrush. and then tie the ends in a knot to create a loop for hanging.