Paper Plate Flower Garden Wreath
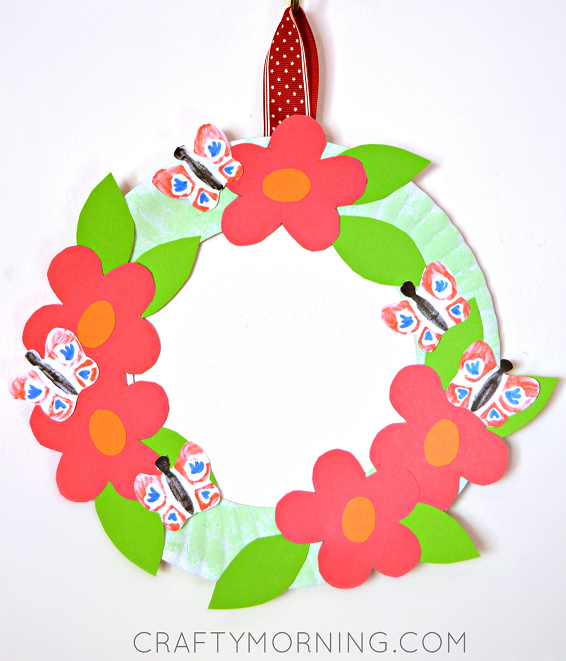
Celebrate the warmer months with this paper plate wreath. Featuring flowers, leaves and a few butterflies, this colorful wreath would be so fun for kids to make! Even as a gift!
Materials Needed:
- Paper Plate
- Red, green, white, and orange cardstock paper
- Red ribbon
- 1.4” high butterfly foam stamp
- Light green acrylic paint
- Red, blue and black felt-tip pens
- A sponge
- Plastic lid with a diameter of 5.6”
- Scissors/Glue
Instructions for making the project:
1. Place and center the 5.6” plastic lid onto the paper plate and trace all around it. Cut out the inner circle to make the paper base for the wreath.
2. Use the light green paint and the sponge to add color to the base of the wreath. Allow to dry thoroughly.
3. Make a loop with the ribbon and glue it to the back of the wreath. Allow to dry while continuing with the rest of the steps.
4. Trace five flowers onto the red cardstock, and ten leaves onto the green cardstock, and cut them all out. Note: Depending on the child’s age, this step might require some help from an adult.
5. Draw five small ovals on the orange cardstock and cut them out. Glue one oval on each flower to add detail to the flowers.
6. Arrange and glue the flowers and leaves to the wreath.
7. Use the foam stamp and stamp five butterflies onto the white paper:
8. Use the felt-tip pens to color the butterfly’s body black and the wings red. Transfer the image onto the white paper and then carefully lift the stamp. Repeat four more times. Then, use the blue felt-tip pen to add a bit more detail to the butterflies’ wings.
9. Cut the butterflies out and glue them to the wreath.