• Home
  • Kids Crafts
  • Holiday Crafts
  • DIY
  • Recipes
  • About

Crafty Morning

Kids Crafts, Recipes, and DIY Projects

  • Fall Crafts
  • Halloween Crafts
  • Thanksgiving Crafts
  • Winter Crafts
  • Christmas Crafts
    • Christmas Ornaments
    • Christmas Tree Ideas
  • Activities

DIY Ideas, Fall Crafts, Pumpkin Decorating Ideas · August 20, 2020

How to Make Dryer Vent Pumpkins

  • Share
  • Tweet
  • Email
This post may contain affiliate links, read our Disclosure Policy for more information. As an Amazon Associate I earn from qualifying purchases, thank you!

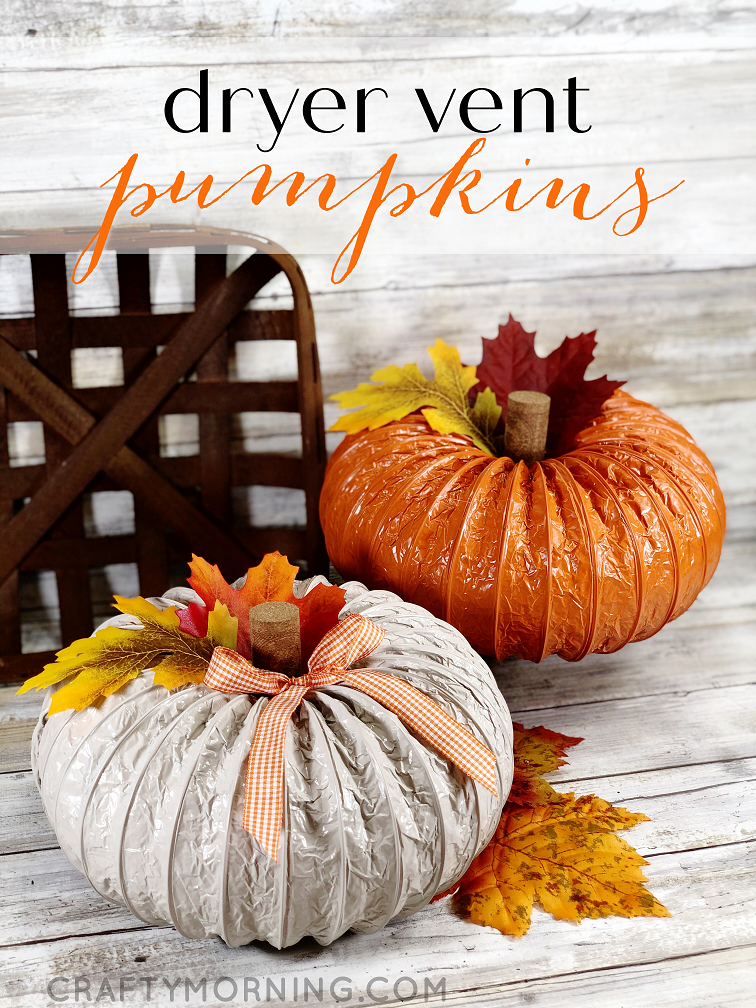
Ever wondered what you could make out of dryer vent ducts?! Okay, maybe not but they make adorable little pumpkins for fall decor in your home!

Jump to Recipe Print Recipe

You can customize them in a million different ways - even a teal colored one would look awesome! For these I used the colors Smokey Beige and Rustic Orange.

Not only are these super cute but they are fun to make! Call up some of your friends and have a wine and craft night :) If you buy a 8 foot dryer vent duct, you can make 4 pumpkins with it!!

Watch how they are made in this video:

Dryer Vent Pumpkins

Print Recipe Pin Recipe

Ingredients

  • Flexible Aluminum Dryer Vent Duct 4 inch wide inside
  • Rust-oleum Spray Paint & Primer I used Rustic Orange and Smokey Beige colors
  • Ribbon
  • Wine cork
  • Hot glue gun
  • Fake fall colored leaves
  • Wire cutter

Instructions

  • Stretch out the dryer vent duct and measure 24 inches (2 feet). Take a scissors and cut around through it. You will probably need a wire cutter to get it completely off.
  • Fold the ends inside on each end.
  • Wrap the dryer vent duct into a circle and hot glue the edges. Hold for 30 seconds. (I found it was easier gluing the bottom part first then the second half.)
  • On a piece of cardboard, spray paint the duct outside and let dry. You will need to spray the top and let dry before you flip and do the bottom.
  • Hot glue on some fall leaves and a wine cork for the pumpkin stem.
  • Tie a bow with a ribbon and hot glue it on.
  • Time to display your pumpkins!
Make sure to follow Crafty Morning on Facebook, Pinterest, and Instagram or subscribe to our Weekly Newsletter! :)
  • Share
  • Tweet
  • Email
  • Facebook
  • Instagram
  • Pinterest
  • TikTok
  • Twitter
  • YouTube

You’ll Also Love

Metal Folding Chair Makeovers
Easy Fingerprint Candy Cane Christmas Craft For Kids
DIY Rice Krispie Heart Valentine Treat
Next Post >

Toilet Paper Roll Peppermint Decor

Welcome to Crafty Morning...I'm so happy you're here! I'm Michelle; a 30-something, crafty mom who loves to keep busy! You can read more about me here. Visit my other websites too: The Happy Farmhouse and My Heavenly Recipes

Reader Favorites

  • Pouring Paint Can Curtains
  • Make Cloud Dough Using 3 Ingredients
  • Cupid Chow Recipe
  • 3-Ingredient Orange Chicken Sauce Recipe
  • Valentine M&M Butterfly Treats

Stay Updated

Trending Now

  • Pouring Paint Can Curtains
  • Make Cloud Dough Using 3 Ingredients
  • Cupid Chow Recipe
  • 3-Ingredient Orange Chicken Sauce Recipe

hey there!

Since you made it all the way down here please take a moment to follow us on Social Media! Our Crafty Morning Facebook page is almost to 6 million followers! Woo-hoo!!

Browse by Holiday

  • Valentines Day Crafts
  • St. Patricks Day Crafts
  • Easter Craft Ideas
  • 4th of July Crafts
  • Halloween Crafts
  • Thanksgiving Crafts
  • Christmas Crafts

Browse by Seasons

  • Spring Crafts
  • Summer Crafts
  • Fall Crafts
  • Winter Crafts
  • Coloring Pages

Browse the Kitchen

  • My Heavenly Recipes Website
  • All Recipes
  • Easy Meal Ideas
  • Drinks
  • Desserts

Browse by Type

  • Handprint Crafts
  • Footprint Crafts
  • Paper Plate Crafts
  • Toilet Paper Roll Crafts
  • Popsicle Stick Crafts
  • Egg Carton Crafts
  • Disclosure Policy/ Privacy Policy
  • Contact

Copyright © 2023 Crafty Morning · Theme by 17th Avenue