• Home
  • Kids Crafts
  • Holiday Crafts
  • DIY
  • Recipes
  • About

Crafty Morning

Kids Crafts, Recipes, and DIY Projects

  • Fall Crafts
  • Halloween Crafts
  • Thanksgiving Crafts
  • Winter Crafts
  • Christmas Crafts
    • Christmas Ornaments
    • Christmas Tree Ideas
  • Activities

Creative Foods, Desserts/Treats, DIY Ideas, Wedding Ideas · January 23, 2014

How to Make Tuxedo Strawberries

  • Share
  • Tweet
  • Email
This post may contain affiliate links, read our Disclosure Policy for more information. As an Amazon Associate I earn from qualifying purchases, thank you!
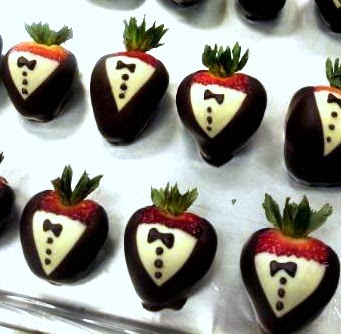
tuxedo strawberries diy
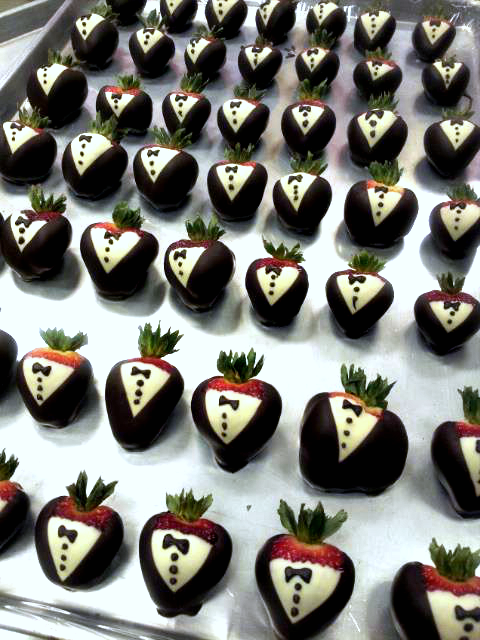
If you've ever wondered how to make these adorable tuxedo strawberries, here is the instructions on how to do them! They are pretty easy to make after you practice on one or two first. These are normally popular for weddings where you can also make wedding dress strawberries to go with the tuxedos!  I have also seen them at birthdays, parties, anniversaries, and just for fun at home. Enjoy!
Ingredients:
  • 1 lb large strawberries
  • 12 oz chocolate candy coating
  • 12 oz white chocolate candy coating
strawberries tuxedo

Directions:

  1. Wash strawberries and line a cookie sheet with wax paper.
  2. Melt the white chocolate coating in the microwave, stirring it every 30 seconds until smooth.
  3. Dip the strawberry into the white chocolate, leaving a little red showing at the top. Wipe excess chocolate off the bottom of the berries on the side of the bowl.
  4. Put each finished strawberry onto the baking sheet and pop them into the refrigerator so they can harden. (about 10-20 minutes)
  5. Melt chocolate in the microwave, stirring every 30 seconds.
  6. Once your strawberries have been set, dip it into the chocolate at a 45 degree angle on both sides.
  7. Put them back on the baking sheet.
  8. Spoon a little dark chocolate into a ziploc bag and cut the corner tip.
  9. Pipe on little bow ties (make two side-way triangles) and three dots for buttons.
  10. Put back in the refrigerator for about 10-15 minutes to set and they're ready to eat!

Make sure to follow Crafty Morning on Facebook, Pinterest, and Instagram or subscribe to our Weekly Newsletter! :)
  • Share
  • Tweet
  • Email
  • Facebook
  • Instagram
  • Pinterest
  • TikTok
  • Twitter
  • YouTube

You’ll Also Love

Peanut Butter Spider Cookies
Pull-Apart Cupcake Flower Bouquet for Mom
Crazy Cat Lady Halloween Costume
Next Post >

DIY Mickey Mouse Nail Design

Welcome to Crafty Morning...I'm so happy you're here! I'm Michelle; a 30-something, crafty mom who loves to keep busy! You can read more about me here. Visit my other websites too: The Happy Farmhouse and My Heavenly Recipes

Reader Favorites

  • Free Printable Easter Coloring Pages
  • Rice Krispie Nests (Easter Treats)
  • Easter Magic Cookie Bars
  • 3-Ingredient Orange Chicken Sauce Recipe
  • The Fastest Way to Clean Your Oven Glass

Stay Updated

Trending Now

  • Free Printable Easter Coloring Pages
  • Rice Krispie Nests (Easter Treats)
  • Easter Magic Cookie Bars
  • 3-Ingredient Orange Chicken Sauce Recipe

hey there!

Since you made it all the way down here please take a moment to follow us on Social Media! Our Crafty Morning Facebook page is almost to 6 million followers! Woo-hoo!!

Browse by Holiday

  • Valentines Day Crafts
  • St. Patricks Day Crafts
  • Easter Craft Ideas
  • 4th of July Crafts
  • Halloween Crafts
  • Thanksgiving Crafts
  • Christmas Crafts

Browse by Seasons

  • Spring Crafts
  • Summer Crafts
  • Fall Crafts
  • Winter Crafts
  • Coloring Pages

Browse the Kitchen

  • My Heavenly Recipes Website
  • All Recipes
  • Easy Meal Ideas
  • Drinks
  • Desserts

Browse by Type

  • Handprint Crafts
  • Footprint Crafts
  • Paper Plate Crafts
  • Toilet Paper Roll Crafts
  • Popsicle Stick Crafts
  • Egg Carton Crafts
  • Disclosure Policy/ Privacy Policy
  • Contact

Copyright © 2023 Crafty Morning · Theme by 17th Avenue