Laminated Photo Snowglobe Ornaments
DIY Snow Globe Ornaments

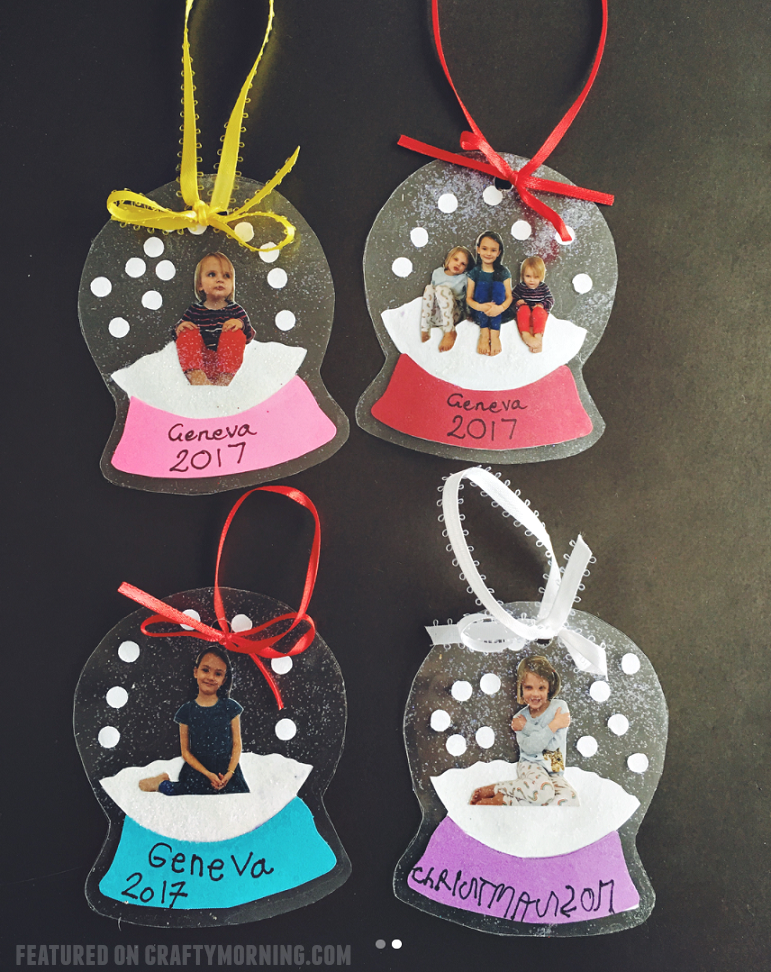
These darling little photo snowglobe ornaments were made by Megan Hayashi! They would be perfect for parent or grandparent gifts at Christmas time. Have a whole daycare or your classroom make them! Cheap and easy ornament to make. If you don’t have a laminator try using contact paper instead!
You will need these Items: Free Printable Snow Globe Template, Laminator, Laminating sheets, White acrylic paint, Glitter, Card stock paper, and Twine.

Grab your materials, including a printable snow globe template, laminator, laminating sheets, white acrylic paint, glitter, card stock paper, twine, and some adorable photos! Let’s Get Crafty!
First, open up a laminating sheet and trace the printable template circles onto it. You can fit about four per sheet, so get tracing! Next, paint one side of the circle near the bottom with white acrylic paint to create a snowy effect. Have the kiddos join in on the fun by adding white dots of paint around where the picture will be. Their fingerprints will add an extra-special touch!
Add Some Sparkle and Shine! Lightly sprinkle some glitter around the image to give it a magical sparkle. Once the paint is completely dry, cut out the image of the child (get close to the edges to avoid any background). Position the image in the middle of the painted circle and secure it with double-sided tape. Be sure to stay away from the edges so the laminating sheets will stick!
Laminate the circle, punch a hole in the top for some twine, and cut out a base from laminated card stock using the printable template. Glue or tape the base near the bottom of the laminated circle, and voilà! Write the child’s name and the year with a Sharpie, and you’ve got a beautiful, one-of-a-kind ornament to give as a gift or hang on the Christmas tree! Pro Tip: For an extra-durable ornament, try laminating only two per page with the card stock paper base underneath. Happy crafting!
If you like these snow globes, try making our cup snow globe ornaments!

Watch the video on how to make them…

Laminated Snow Globe Ornaments
Materials
- Free Printable Snow Globe Template (Found at https://www.craftymorning.com/free-laminated-snow-globe-template)
- Laminator
- Laminating sheets
- White acrylic paint
- Glitter
- Card stock paper
- Twine
- Photos
Instructions
- Open a laminating sheet and trace the printable template circles on it. You can fit about 4 per sheet.
- Paint one side near the bottom for the snow. Have the kids put white dots of paint around where the picture will be. It’s cute when they use their fingerprints. Lightly add glitter around image. Let paint completely dry.
- Cut out the image of the child (cut close with no background). Position image on the painted circle in the middle and secure with double sided-tape. Try to stay away from the edges so the laminating sheets will stick. Laminate.
- Punch a hole in the top for string. Cut out a base (use printable template) from laminated card stock. Glue or tape the base near the bottom of the laminated circles. Write their name and the year with sharpie.
- Give as a gift or hang on the Christmas tree! *If you want the whole thing to last longer, do only 2 ornaments on a laminate page and put the card stock paper base underneath then laminate all together!*
Here’s Anthea‘s kids versions of the ornament…so cute having all her kids in one ornament!!