No Carve Pumpkin Minions
How to Make Pumpkin Minions

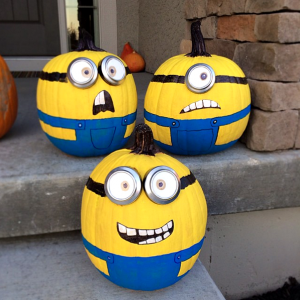
With Halloween just around the corner, I figured i’d start looking for no-carve pumpkin ideas. In fact, I don’t even enjoy carving them (I love painting :) I stumbled across Kristin Herndon on Instagram and saw her adorable minion pumpkins she made! I thought it was so clever that she used the bottom of a soda can for the goggles instead of mason jar lids! What child wouldn’t love to have little minions greet them at the door throughout October?

Materials Needed:
- 2 Coke Cans
- White paper/foam
- Yellow acrylic paint
- Blue acrylic paint
- Black Sharpie
- Hot Glue Gun
- White Paint Pen (or paint)
Kirstin’s Directions:
- First, we painted the top 3/4 of the pumpkins yellow.
- We used paint for the overalls, a paint pen for their teeth and a sharpie for the black areas.
- We used the bottom of coke cans to make their goggles and a little piece of foam for the whites of their eyes – I actually can’t remember where the foam came from but I think it was a packing material of sorts.
- Hot glue the bottom of the soda can to the pumpkin.
“We ordered Gru Stickers to put on their overalls, but they fell right off. It was our first time painting pumpkins and we had a blast. Our dogs were terrified of them at first, but they quickly became friends. :)”
If you want some EVIL minions, here’s some inspiration from Hazel:

If you liked these, check out my other no carve pumpkin decorating ideas!
Minion Pumpkins
Materials
- 2 Coke Cans
- White paper/foam
- Yellow acrylic paint
- Blue acrylic paint
- Black Sharpie
- Hot Glue Gun
- White Paint Pen or paint
Instructions
- Paint the top 3/4 of the pumpkins yellow.
- Use paint for the overalls, a paint pen for their teeth and a sharpie for the black areas.
- Use the bottom of coke cans to make their goggles and a little piece of foam for the whites for their eyes.
- Hot glue the bottom of the soda can to the pumpkin.

The Minions are sooo cute!!!
Minion pumpkins, what an adorable idea! I can’t wait to create some with my granddaughter.
The lids to metal spice containers would work perfect for the goggles.
I love the way those minion pumpkins look and you don’t have to carve them :-) I’m definitely going to do a couple, thanks. My two year old loves them.
So cute. I think canning lids would work great for eyes too. The underside of the sealing lid is usually white. A little hot glue to hold it in place.