• Christmas Crafts
  • Thanksgiving Crafts
  • Winter Crafts
  • Printables
  • Nav Social Menu

    • Facebook
    • Instagram
    • Pinterest
    • Twitter
    • YouTube

Crafty Morning

  • Home
  • Kids Crafts
  • Holiday Crafts
  • DIY
  • Recipes
  • About

Mickey Mouse Oreos

Creative Foods

8 Mar
This post may contain affiliate links, read our Disclosure Policy for more information. As an Amazon Associate I earn from qualifying purchases, thank you!
  • Share
  • Tweet
  • Pin

mickey-mouse-oreos

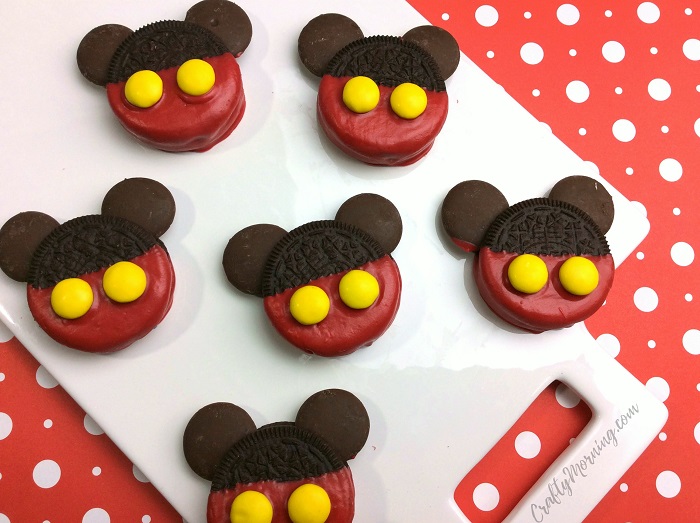
These Mickey mouse oreos would be a huge hit at a birthday party or baby shower! They are so easy to make and are adorable.

Makes 24 oreos
Ingredients
  • 1 package of double stuffed oreos
  • 1 bag of chocolate melting wafers
  • 1 bag of red candy melts
  • 1 cup yellow M&M's
  • wax paper
  • cookie sheet
  • two small pots
  • tooth picks

mickey-mouse-oreos-treat-for-kids

mickey-mouse-oreos-treats-kids

Directions
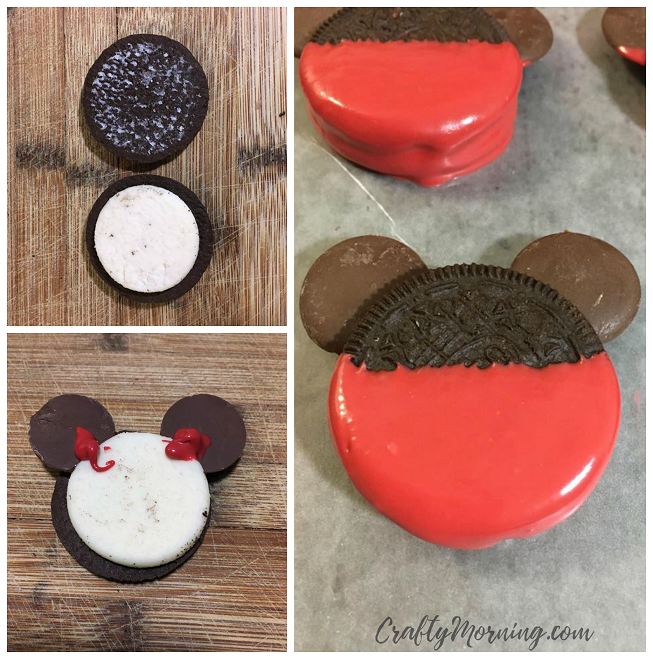
  1. Gently tear apart the oreos so that you have one half clean of filling and the filling is on the other half
  2. Fill ¼ of the bottom pot with water and place on medium heat
  3. Place the second pot on top for a few minutes to get hot
  4. Take one of the chocolate wafers and use your fingers place the bottom edge of the wafer to the bottom of the top pot to "Melt" the wafer to edge it
  5. Place the melted edge of the wafer to the edge of the filling to make the wafers look like ears
  6. Repeat steps with all filling halves of the cookies
  7. Pour in the red candy melts into the same top pot and using a spoon, mix until melted.
  8. Using a tooth pick, once the red is melted, dip the toothpick into the candy melt and then drop some of the candy melt onto the edge of the chocolate wafer and filling to create a "glue"
  9. Place the none filling half of the cookie on top of the filling half so that the "glue" will cool onto the other half and hold the cookie in place.
  10. Dip the cookies half way into the red candy melt and then place on the wax paper
  11. Place two yellow M&M's on the red part of the cookie for the buttons
  12. repeat steps with remaining cookies
  13. Let harden in the fridge for about 20 minutes before enjoying.
  • Share
  • Tweet
  • Pin

More Ideas You'll Love!

  • Minnie Mouse Pull-Apart Cupcake Cake
  • Mickey & Minnie Mouse Pumpkin Decorating
  • Vans Launches New 90th Anniversary Mickey Mouse Collection
  • Folded Heart Mouse Craft For Kids
  • Minnie & Mickey Mouse Christmas Wreaths
  • 3D Paper Mouse Craft for Kids
  • Easy Mouse Toilet Paper Roll Craft For Kids
  • Night Before Christmas Footprint Mouse Canvas
Make sure to follow Crafty Morning on Facebook, Pinterest, and Instagram or subscribe to our Weekly Newsletter! :)

Browse all our fun categories:

Previous Post: « Baked Bruschetta Chicken
Next Post: Leprechaun Pudding Cup Craft »

Reader Interactions


Leave a Reply Cancel reply

You must be logged in to post a comment.

Primary Sidebar

Welcome to Crafty Morning...I'm so happy you're here! I'm Michelle; a 30-something, crafty mom who loves to keep busy! You can read more about me here. Visit my other websites too: The Happy Farmhouse and My Heavenly Recipes

Trending Posts:

  • 3D Pasta Christmas Trees
  • How to Make Ribbon Angel Ornaments
  • Paw Print Christmas Tree Keepsake

Copyright © 2020 · Refined Theme on Genesis Framework · WordPress ·Log in Disclosure/Privacy Policy